
Your old desktop PC gave you years of reliable service, but eventually it couldn't keep up with modern tasks and applications; so you went out and bought something newer and faster. Now you need to decide what to do with the old clunker.

You could e-recycle it--hand it off to a responsible company that will dismantle it and recycle the parts--but what do you gain from that aside from feeling good about being environmentally responsible? Allow us to suggest another solution: Repurpose the old hulk as a local server. You can use it as a repository for automatic PC backups, or set it up as a file server that you and your employees can access while you're on the road. Those are just two of the roles that an older PC can perform that are of far more benefit to your business than having the machine collect dust or head for the dump.
Best of all, the software--FreeNAS--that will power this machine is exactly what its name describes: a free operating system for network-attached storage. And side from being free, FreeNAS is easy to install, configure, and run. You'll find everything you need to know in this guide.
Installing FreeNAS
Before you begin your FreeNAS installation, obtain a USB thumb drive with a capacity of at least 2GB. You'll install FreeNAS to this drive and boot from it, because you can't run the OS on the same drive that you're using to share files from. Alternatively, you can buy a very small solid-state drive, install FreeNAS on that, and boot the server from it; but investing in such an SSD is an unnecessary expense (unless you're worried that someone might remove the USB drive without realizing the consequences).
You'll need a USB key with at least 2GB of storage for this project.
Once you have the necessary thumb drive, download the latest version of FreeNAS from the operating system's official site, taking care to choose the right disc image (that is, .iso file): x86 if your machine is equipped with a 32-bit CPU, or x64 if it has a 64-bit processor. After downloading the .iso file, burn it to a blank CD and drop it into your server-to-be's optical drive.
Now, power up the computer, tap the key that calls up its BIOS boot menu, and choose the option to have the machine boot from its optical drive instead of from its hard drive. If no such menu exists, you'll have to enter the BIOS itself and change the boot order there.
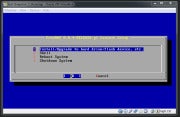
Choose the option to install FreeNAS to a flash drive.
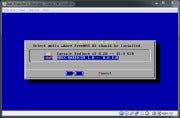
Once all of FreeNAS's FreeBSD-based Linux commands have done their work, you'll see a simple installation screen that gives you four options to choose from. Select the first--the option to install or upgrade FreeNAS 8 to a hard drive or flash drive--and press Enter. Any storage media connected to your system will appear on the next screen. In that next screen, you'll eventually want to select your flash drive as a target for the installation (the OS will create two partitions on the drive: one for the OS itself and one for future FreeNAS upgrades)--but don't press anything yet.
Make sure that you don't need any of the existing data on your flash drive.
Before choosing the installation destination, you need to be aware that FreeNAS will eradicate the data and partitions on the flash drive that you install it on. So this is your last chance to archive any files that your flash drive already contains, before they vanish forever. When you're ready, choose the thumb drive, select Yes, and press Enter. A prompt will appear when the FreeNAS installation process is complete. Press Enter and then select the option to reboot your system in the main menu.
While your system is rebooting, repeat the step where you chose which drive FreeNAS will boot from by default--but this time specify that you want it to boot from the thumb drive plugged into one of the system's USB ports.
Setting Up Your Storage
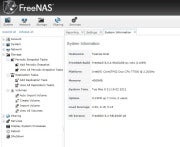
Once FreeNAS has finished loading, you'll see a console screen that lists all of the networking options you can set for FreeNAS. At this point, your server is up and running.
Assuming that your system works fine at the default settings--and it should, as long as it's connected to your network via ethernet cable--you'll receive an IP address that you can use to access FreeNAS's primary settings. Type this IP address into the Web browser's address bar on any system connected to your network and press Enter.
Establish admin credentials so that you can manage the server.
The first thing you'll want to do within this Web-based configuration screen is to change your user credentials. Look to the left side and click the My Account menu item to expand it. Now choose an admin user name and a password. Click the button to save your changes. Then click Change Password and do the same. Security first!
To set up your storage volumes, click the Storage button in the upper-left corner of the FreeNAS Web-based configuration screen. From there, click the Create Volume button that appears in the main window. Give your volume a name, select the number of drives you'll want to use to create the volume, and select ZFS as the file system type. You'll find that ZFS delivers a number of benefits that the Unix File System does not. If you're combining multiple drives, you'll have an opportunity at this point to select which RAID type you want to use.
ZFS is a superior file system, offering benefits not available in UFS.
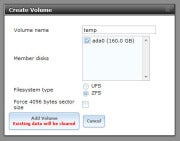
Click the Add Volume button when you're ready. If you want your storage to be a shared resource in your office, so that you won't have any individual user account permissions to manage, click the Change Permissions icon and grant write access to both Group and Other users (be sure to select the Set Permissions Recursively option, too). Press the big Change button to cement your configuration.
Setting Up Shares
You've created a basic storage volume on your FreeNAS-powered machine. Now you need to set up your sharing arrangement so that other users can find and access your drive's contents.
 CIFS shares are the way to go if your office uses a blend of Mac, Linux, and Windows systems. If you have a Mac-only setup, you might be better served (no pun intended) by configuring the drive for AFP shares. In the spirit of inclusivity, we'll walk through a CIFS setup.
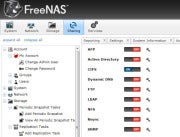
Choose CIFS sharing if your network is PC-only or a mix of Macs and PCs.
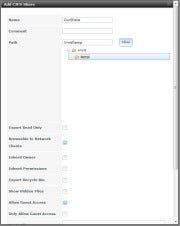
Click the Sharing button in the Web configuration screen's left-hand sidebar, and select Add CIFS Share. Give your share drive a name and select your volume by clicking the Browse button on the 'Path' line. Hint: The name you previously assigned to your volume should appear within the /mnt/ folder. Click it and click the Close button. Make sure that the box next to Allow Guest Access is checked, and then click OK.
Finally, click the Services button on the left sidebar and select the Control Services option. Flip the switch on the main panel's CIFS setting to on. Voilà! Type two bakslashes and then the FreeNAS IP address (for example, \\192.168.0.1), into a Windows Explorer window and press Enter; your shared drive should appear. Use Windows to map this network drive, and you'll never need to hunt it down with an IP address again.
 In covering this series of steps, we've glossed over some configuration options that could play a big role in allowing you to see your shared network drive--such as making sure that the CIFS settings (Services, CIFS) are using the correct workgroup for your network configuration. If you find that this basic setup guide isn't working for you, a network configuration issue is probably holding you back. To resolve the issue, make sure that your FreeNAS network settings basically match those of the other computers on your network.
Our simple share drive is but the tip of the FreeNAS iceberg with regard to features. Options include locking drive access to users and groups, creating recurring snapshots for restoring older copies of files or deleted files entirely, and using the power combination of Dynamic DNS and FTP access to give your offsite workers easy access to the files they need. Now that you've mastered the basics, a world of advanced configurations and scenarios is yours to explore!
Backing Up
Windows 7 Professional and Ultimate allow you to back up and restore your PC over a network.
If you'd like to use your FreeNAS server as a host for automatic client PC backups, you can choose from any number of commercial and freeware applications to run on those clients. If you're running Windows 7 Professional or higher, you can use the built-in Windows Backup and Restore tool (lower versions won't allow you to back up over a network).
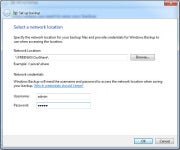
Pull up the app within Windows 7 and click the Set Up Backup link. Select Save on a Network, and use the Browse button to pull up the shared FreeNAS folder you created. If you've already assigned yourself a user account on the FreeNAS server, type in your user name and password; if you haven't, use the default admin user name and password you set up earlier.
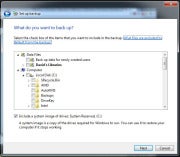
You can let Windows choose the files it thinks are the most important and should be backed up, or you can identify specific files and folders yourself. After that, you should be done with picking options. Your backup will start its first run. When it has finished, click the Change Settings link, and create an automated backup schedule.
PCWorld Contributing Editor David Murphy loves finding new ways to use old systems, but his electric bill isn't quite as thrilled about the practice.
You could e-recycle it--hand it off to a responsible company that will dismantle it and recycle the parts--but what do you gain from that aside from feeling good about being environmentally responsible? Allow us to suggest another solution: Repurpose the old hulk as a local server. You can use it as a repository for automatic PC backups, or set it up as a file server that you and your employees can access while you're on the road. Those are just two of the roles that an older PC can perform that are of far more benefit to your business than having the machine collect dust or head for the dump.
Best of all, the software--FreeNAS--that will power this machine is exactly what its name describes: a free operating system for network-attached storage. And side from being free, FreeNAS is easy to install, configure, and run. You'll find everything you need to know in this guide.
Installing FreeNAS
Before you begin your FreeNAS installation, obtain a USB thumb drive with a capacity of at least 2GB. You'll install FreeNAS to this drive and boot from it, because you can't run the OS on the same drive that you're using to share files from. Alternatively, you can buy a very small solid-state drive, install FreeNAS on that, and boot the server from it; but investing in such an SSD is an unnecessary expense (unless you're worried that someone might remove the USB drive without realizing the consequences).
You'll need a USB key with at least 2GB of storage for this project.
Once you have the necessary thumb drive, download the latest version of FreeNAS from the operating system's official site, taking care to choose the right disc image (that is, .iso file): x86 if your machine is equipped with a 32-bit CPU, or x64 if it has a 64-bit processor. After downloading the .iso file, burn it to a blank CD and drop it into your server-to-be's optical drive.
Now, power up the computer, tap the key that calls up its BIOS boot menu, and choose the option to have the machine boot from its optical drive instead of from its hard drive. If no such menu exists, you'll have to enter the BIOS itself and change the boot order there.
Choose the option to install FreeNAS to a flash drive.
Once all of FreeNAS's FreeBSD-based Linux commands have done their work, you'll see a simple installation screen that gives you four options to choose from. Select the first--the option to install or upgrade FreeNAS 8 to a hard drive or flash drive--and press Enter. Any storage media connected to your system will appear on the next screen. In that next screen, you'll eventually want to select your flash drive as a target for the installation (the OS will create two partitions on the drive: one for the OS itself and one for future FreeNAS upgrades)--but don't press anything yet.
Make sure that you don't need any of the existing data on your flash drive.
Before choosing the installation destination, you need to be aware that FreeNAS will eradicate the data and partitions on the flash drive that you install it on. So this is your last chance to archive any files that your flash drive already contains, before they vanish forever. When you're ready, choose the thumb drive, select Yes, and press Enter. A prompt will appear when the FreeNAS installation process is complete. Press Enter and then select the option to reboot your system in the main menu.
While your system is rebooting, repeat the step where you chose which drive FreeNAS will boot from by default--but this time specify that you want it to boot from the thumb drive plugged into one of the system's USB ports.
Setting Up Your Storage
Once FreeNAS has finished loading, you'll see a console screen that lists all of the networking options you can set for FreeNAS. At this point, your server is up and running.
Assuming that your system works fine at the default settings--and it should, as long as it's connected to your network via ethernet cable--you'll receive an IP address that you can use to access FreeNAS's primary settings. Type this IP address into the Web browser's address bar on any system connected to your network and press Enter.
Establish admin credentials so that you can manage the server.
The first thing you'll want to do within this Web-based configuration screen is to change your user credentials. Look to the left side and click the My Account menu item to expand it. Now choose an admin user name and a password. Click the button to save your changes. Then click Change Password and do the same. Security first!
To set up your storage volumes, click the Storage button in the upper-left corner of the FreeNAS Web-based configuration screen. From there, click the Create Volume button that appears in the main window. Give your volume a name, select the number of drives you'll want to use to create the volume, and select ZFS as the file system type. You'll find that ZFS delivers a number of benefits that the Unix File System does not. If you're combining multiple drives, you'll have an opportunity at this point to select which RAID type you want to use.
ZFS is a superior file system, offering benefits not available in UFS.
Click the Add Volume button when you're ready. If you want your storage to be a shared resource in your office, so that you won't have any individual user account permissions to manage, click the Change Permissions icon and grant write access to both Group and Other users (be sure to select the Set Permissions Recursively option, too). Press the big Change button to cement your configuration.
Setting Up Shares
You've created a basic storage volume on your FreeNAS-powered machine. Now you need to set up your sharing arrangement so that other users can find and access your drive's contents.
Choose CIFS sharing if your network is PC-only or a mix of Macs and PCs.
Click the Sharing button in the Web configuration screen's left-hand sidebar, and select Add CIFS Share. Give your share drive a name and select your volume by clicking the Browse button on the 'Path' line. Hint: The name you previously assigned to your volume should appear within the /mnt/ folder. Click it and click the Close button. Make sure that the box next to Allow Guest Access is checked, and then click OK.
Finally, click the Services button on the left sidebar and select the Control Services option. Flip the switch on the main panel's CIFS setting to on. Voilà! Type two bakslashes and then the FreeNAS IP address (for example, \\192.168.0.1), into a Windows Explorer window and press Enter; your shared drive should appear. Use Windows to map this network drive, and you'll never need to hunt it down with an IP address again.
Our simple share drive is but the tip of the FreeNAS iceberg with regard to features. Options include locking drive access to users and groups, creating recurring snapshots for restoring older copies of files or deleted files entirely, and using the power combination of Dynamic DNS and FTP access to give your offsite workers easy access to the files they need. Now that you've mastered the basics, a world of advanced configurations and scenarios is yours to explore!
Backing Up
Windows 7 Professional and Ultimate allow you to back up and restore your PC over a network.
If you'd like to use your FreeNAS server as a host for automatic client PC backups, you can choose from any number of commercial and freeware applications to run on those clients. If you're running Windows 7 Professional or higher, you can use the built-in Windows Backup and Restore tool (lower versions won't allow you to back up over a network).
Pull up the app within Windows 7 and click the Set Up Backup link. Select Save on a Network, and use the Browse button to pull up the shared FreeNAS folder you created. If you've already assigned yourself a user account on the FreeNAS server, type in your user name and password; if you haven't, use the default admin user name and password you set up earlier.
You can let Windows choose the files it thinks are the most important and should be backed up, or you can identify specific files and folders yourself. After that, you should be done with picking options. Your backup will start its first run. When it has finished, click the Change Settings link, and create an automated backup schedule.
PCWorld Contributing Editor David Murphy loves finding new ways to use old systems, but his electric bill isn't quite as thrilled about the practice.
No comments:
Post a Comment